Wednesday, January 6, 2010

Mango Pickle and Pickled Pears

My long-anticipated pickling adventure is finally underway, aided by a timely gift: The Joy of Pickling.  So far, it seems to be an excellent book.

I started off with a couple of somewhat unconventional recipes.  Things that wouldn't necessarily come to mind when you think of pickles, at least.

If you've never tried mango pickle, you should.  They are delicious.  Check out your local Indian grocery store.

We can't really get the kind of mango that's used in India stateside, so I had to make due with a normal, underripe mango from the grocery.  I only used one mango, and cut the recipe to a third, but I'll reproduce it with original quantities.

3 slightly underripe mangoes, peeled and sliced lengthwise
3 fresh chile peppers (I used jalapeno), one cut into thin strips and the others minced
1 1/2 teaspoons pickling salt
1/2 cup white wine vinegar
1 teaspoon coriander seeds
3/4 teaspoon fenugreek seeds
1 teaspoon cumin seeds
1/3 cup oil (preferably mustard, although I didn't have any)
2 tablespoons grated ginger
1 tablespoon minced garlic
1 teaspoon whole yellow mustard seeds (I need to get some, ommitted this time)

Fry the garlic, ginger and minced chile in the oil.
Toast then grind the whole spices.
Mix the mango with the salt, vinegar and chile strips.
Add the spices to the oil mixture, then mix everything and transfer to a tightly sealed jar.
Let the jar stand for several days at room temperature, shaking at least once a day.
If you don't eat the pickle immediately, put it in the fridge where it should last at least 2 months.

My pickle still has a couple days to go, but it looks and smells real nice.


I don't think I'd ever had pickled pears, but I liked the idea and there were underripe Bosc pears to be had for 29 cents a pound.  You want pretty firm pears for pickling.  Apparently the traditional variety to use is Seckel pears.

I used 3 pounds of pears, 8 or 9 total.  The recipe below is for 6 pounds.  In addition to the pears, you want:

Four 3-inch cinnamon sticks
2 tablespoons whole cloves
One 1-inch piece ginger, thinly sliced
3-4 pieces star anise, whole (my addition)
3 cups water
2 cups distilled white vinegar or white wine vinegar (I used 50/50 combo)
4 cups sugar

Put everything except the pears in a (ideally non-reactive) pot.  Boil to dissolve the sugar, then simmer for 15 minutes.
The pears should be peeled and left whole if small or halved and cored, if large.
Cook the pears gently in the syrup in a single layer until just tender.  The recipe says 5-15 minutes, but it took me about 25.  This may have been due to the pears not being fully submerged in my half-quantity of liquid.  Luckily they all fit in the pot, so it was only 25 minutes total.
If you wanted the pears to keep for a long time, you would pour them into jars and seal them with two-piece caps, leaving 1/2 inch headspace, then process the jars for 15 minutes in a boiling-water bath.

Since I was making a relatively small quantity and there was room in the fridge, I skipped this step.


Two of the pears are missing from this picture.  They featured in a delicious salad of spring greens that I highly recommend, but is sadly not pictured.  Here's what I put in the salad.

For the dressing, pound one clove of garlic to a paste.  Add salt, pepper, minced jalapeno and about a tablespoon of white wine vinegar.  Stir in about 3 tablespoons of olive oil.
Dress the greens and add sliced, pickled pear, toasted walnuts and more salt and pepper to taste.  I also used some sliced tomato, but this component was dispensable, I think.  Really a delicious salad, and a perfect platform for the pears.

Bagels

I actually made these bagels about a month ago.  A repeat attempt is imminent.

I followed Mark Bittman's recipe, with maple syrup as the sweetener.  3.5 cups flour, 2 teaspoons salt, 1 teaspoon instant yeast (or the equivalent amount of active dry yeast [activated] which is what I used), 2 tablespoons sweetener and enough water to form a dense, just slightly sticky dough.  The result certainly wasn't the best looking bagel I've ever seen, but it did the trick in this bagel wasteland.

Forming the bagels:


Boiling:


And baking:


Monday, January 4, 2010

SEE FOOD


The thing with eating is that it takes time. The most recent of my gastronomique tourisms brought YHN to Phuket, Thailand. A land more famed for its banana hammocks than banana flambes, I was nevertheless devoted to finding that special taste of Thailand that is not from a hooker's mouth. But I digress.

Plated before me is Phuket Fried Rice and a tiger prawn the size of Mike Ditka's finger. The Phuket Fried Rice should be renamed Phuket Fried Bullshit, because this was the single most over-black-peppered under-proper-spiced dish I've had. To save face I told my dining companion that I was taking the second half of the dish on my Tiger Airways flight the following day, but in reality I found the styrofoam box and its pFrice contents to be of a supremely puntable quality.

But what allowed me to declare myself fed enough to go for take-away, that shamestful of shameable shames?

TIGER PRAWN, the less philandering brother of tiger woods. Look upon my works, ye mighty, and despair

BBQ'd


Flayed and arrayed in garlic and pepper


My [tigerprawn] is a fish

In truth, not the best meal I had.

Indeed, I found in Thailand that food goodness is inversely proportional to food cost. For instance, the best food I ate in Thailand was outside a Bangkok skytrain station. Following the time honored tradition of getting in line at a stall if lots of other people are, I found myself with a plastic bagful of the tastiest/spiciest papaya salad this side of the Mekong. I would have taken a photo of it had I not used up the last of my camera battery taking a photo of this dude's rattail. I guess we all make choices.


Enough bandwidth for now. Endeavour!
JK
 

Sunday, December 6, 2009

Dinner Party

The blog has been in a bit of a slump as of late.  Hopefully this menu will inspire some culinary adventures during the upcoming holiday.


I guess the theme of the dinner was extending relatively familiar techniques into new territory.  And making this onion tart, which I've wanted to try since I got Simon Hopkinson's Roast Chicken and Other Stories last year.  I figured as long as I was starting with a tart, I might as well end with one.  So there are the bookends.  As for the gnocchi, I thought it was time to try a complete dish with them after my experiment a couple weeks ago.  For the ragu, I wanted to use a protein that I hadn't cooked before. The beef shank was cheap and delicious, and for sale at the butcher around the corner.  I would probably cook it even longer than 4 hours next time, but the slightly chewy texture was nice enough.  I chose to serve it with orechiette (partially inspired by a recent dinner at Roberta's in Brooklyn) which I've never made before, but like a lot.  Et voila.

Onion Tart
 
The recipe for this tart, which came directly from Roast Chicken is conveniently posted online here.  Unfortunately the units are all metric.  110 g of flour is one cup.  The butter quantities translate to 4 tablespoons (1/2 stick) for the pastry and the same for the filling.  Despite Simon's assurances that four onions, which produce an alarmingly large number of slices (and tears), is the right quantity, I ended up using just three.  I reduced the corresponding amounts of cream (1 cup -> 3/4 cup) and egg yolk for the filling, though not the butter.  As you can see, the tin was completely filled anyway.
 
This tart is delicious.  The caramelized onions are really sweet, and the custard and crust are decadent without overwhelming the onion flavor.  I will definitely make this again, but in the future I would serve it with some simply dressed greens.  I think the added bitterness and acidity, though not strictly necessary, would make this even tastier.

Main Courses
 
As you can see, we made a lot of gnocchi and pasta, almost all of it gone by the end of the evening.

Gnocchi

I made the gnocchi in same way as in my earlier post.

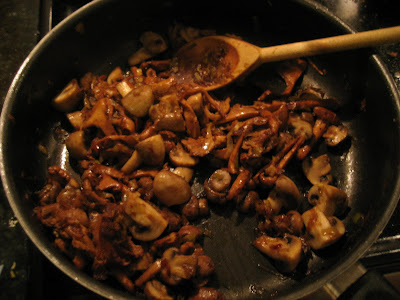
Initially, I wasn't quite sure what I would do with them.  I was thinking of a gorgonzola and mushroom cream sauce.  But there was no gorgonzola anywhere we shopped.  The chanterelles that they had at Costco ended up deciding my course.  Although a bit suspect at almost two weeks old, I figured I would give them a chance for nine bucks a pound.  In the end, I think they were worth it, but they could easily have been disgusting if not handled properly.  The dish was rounded out with another pound of mushrooms, mostly crimini with a few white mushrooms mixed in, three leeks, some cream, some armagnac and butter.

First, I cleaned the mushrooms, using as little water as possible, particularly for the chanterelles, which were already a bit waterlogged.  I ended up discarding several and trimming slimy sections from several more.  Put them out to dry for a while after cleaning.  I cut the mushrooms into halves and quarters or left them whole depending on their size.  Next, I trimmed and cleaned the leeks, discarding of the green section, although my poor quality leeks would have disappeared entirely if I had kept only the white part. I chopped them finely, then stewed them gently in a few tablespoons of butter.

While the leeks were cooking, I threw the chanterelles into a dry pan at medium-high heat.  They released a huge quantity of liquid, which I periodically poured into the leeks to simmer off.  Without this step I think the chanterelles would have been pretty slimy and gross.


After probably 7-8 minutes of this, the chanterelles were pretty well dried out and I threw them in with the leeks, as well as the rest of the mushrooms and a little more butter.  I cranked the heat back up for this stage to brown the mushrooms and added seasoning.  Once they were pretty well cooked, I added a splash of cream.  Once this had reduced a bit, I poured in about 1/2-3/4 cups of Armagnac, which I then lit on fire.  I finished it with a little more cream and then tossed it with the fresh  gnocchi.  People added parmesan themselves.


Beef Shank Ragu with Orechiette


I made the pasta in the usual way.  I think I used four eggs.  To make the circles, I used the cap of an olive oil bottle; to make dimples, we just pressed with our fingers, to varying success.
 
The ragu was made from a little bacon, about a pound of ground pork, onions, carrots, celery, garlic, about two pounds of beef shank, cut in about 1-inch pieces, a bit more than a cup of white wine, some San Marzano tomatoes, a little cream and parsley.


Monday, November 23, 2009

Coconut Chicken with Curried Onions and Rice

What to do with a coconut?  It seems like an easy question until you have to answer it.  First, you have to get the thing open.  Absent a machete, the hammer and knife-cum-chisel combination is probably your best option.  After a number of hard, but controlled strokes of the hammer, the thing should start to crack.  It lets out a satisfying hiss when the inner chamber is punctured and depressurized.  Catch the juice in a bowl to drink.

Take a hammer to the coconut halves.  Try not to break anything with the flying shards.

Now the coconut is open, you have to figure out what to do with it.  Unless you have a bunch of coconut-loving friends, you've got a lot of coconut meat to get through.  I guess I don't have enough friends, so I figured the coconut would provide a nice crust on some chicken thighs.

The thighs were marinated (well, more like coated) in a mixture of the following:

Approximately equal measures of ground cumin, ground coriander and chili powder.  Slightly less turmeric and garam masala.  About 5 cloves of garlic and an equal quantity of ginger, minced.  Salt.  I added some dried galangal too.  Also, the juice of one lemon and enough oil to make the mixture like a wet paste.

After covering the chicken with this mixture, sprinkle grated coconut all over.  Use coconut to sop up the paste that has dripped onto the pan and put it back on the chicken.

Bake.

I also made some onions to go with the chicken.  I don't exactly remember what went into them, but I think there was cumin, black mustard seeds, garlic, maybe some garam masala.  Something along those lines.

The chicken was awesome: juicy enough that no other sauce was needed to lubricate its bed of rice.

Sunday, November 22, 2009

Herby

To bring my garden to a close for the season, I harvested an herby bounty and dried it before a roaring open fire. And by roaring open fire I mean oven. After cutting the herbs and washing them, I placed them on a tray, threw them in my fancy oven, which has a 100 degree "bread proof setting," and let the fragrant goods desiccate for a hot minute.


Now I've got a good amount of rosemary, thyme, lavender, sage, and oregano to last me through the season.
While we all know dried herbs aren't that great, I hope to put them to use in some capacity, particularly as I prepare to re-up my pizza making skills. Bo.

Eggplant Parm...Deconstructed


Greetings friends and fiends. It's been a minute since I've posted on ye olde blog (not to be confused with Playland's homicidal ye olde mill). Like my now decrepit garden, I've left the cultivation and care of this blog to my compatriots, in particular King Boletus, who has been doing an admirable job of filling our screens and minds with a panoply of culinary delights. That said, I wish to offer a humble contribution to this blog in order to not be excommunicated from the Order of the Bolete.


A number of weeks ago, I decided to put to good use two items I possessed in abundance: basil and eggplant. The basil was fresh from my massive basil plant (which was later uprooted by an unscrupulous garden thief) and the eggplant was purchased in a fire sale at the local farmer's market. My usual eggplant preparations are either roasted with garlic and oil, blended into a smoky babaganoush, or fried into oblivion as part of a rich eggplant parm. I zeroed in on eggplant parm but felt that the fried version would capture neither the warmth of the season nor the freshness of its produce. Plus, deep fried eggplant covered in pesto sounded like overkill.


Baking seemed like the obvious route. But how to protect against mushiness? The answer, dear reader, is of course Panko. Lightly oiled and then covered in the Japanese breadcrumb helped me to achieve a crisp lightness found only in the most delicate of tempuras. Lacking large quantities of cheese, I opted to sprinkle sparingly with a good quality parmigiano-reggiano. 


And the pièce de résistance? Pesto. My version was highly non-traditional and combined a ton of fresh basil with enough oil to prevent the blended mixture from becoming completely emulsified. To give it the nutty richness of a more traditional pesto, I added some almonds to the mix. No cheese was added to the sauce, however.


On top of the eggplant foundation, I dolloped pesto and then covered with plum tomatoes, which were then liberally sprinkled with salt and pepper.


Another layer of eggplant, pesto, tomato was then added on top, before being covered in Panko, cheese, and a liberal douse of olive oil.


The end result was crisp and light but also rich from the smooth combination of roasted eggplant, olive oil, and pesto. Twas a meal fit for a Don. Check it.